
Capturing the raw power and beauty of the human body in motion is an art in itself. Fitness photography is a niche that combines the dynamism of sports with the aesthetics of a well-composed picture. It’s not just about snapping a shot mid-jump or mid-lift, but about conveying the strength, dedication, and determination that goes into every workout.
Whether you’re a professional photographer looking to break into this exciting field, or a fitness enthusiast wanting to immortalize your progress, understanding the basics of fitness photography is crucial. In this article, we’ll delve into the top tips and tricks to help you master the art of fitness photography, ensuring every shot you take is as powerful as the subjects you’re capturing. Let’s embark on this journey to bring fitness and photography together, creating a symphony of strength and style.
Fitness Photography Tips
 Defining fitness photography involves capturing the strength, focus, and rigorous discipline of athletes. Emphasizing the human body’s motion and emotion, alongside mastering proper lighting techniques, heavily influences this special niche within photography.
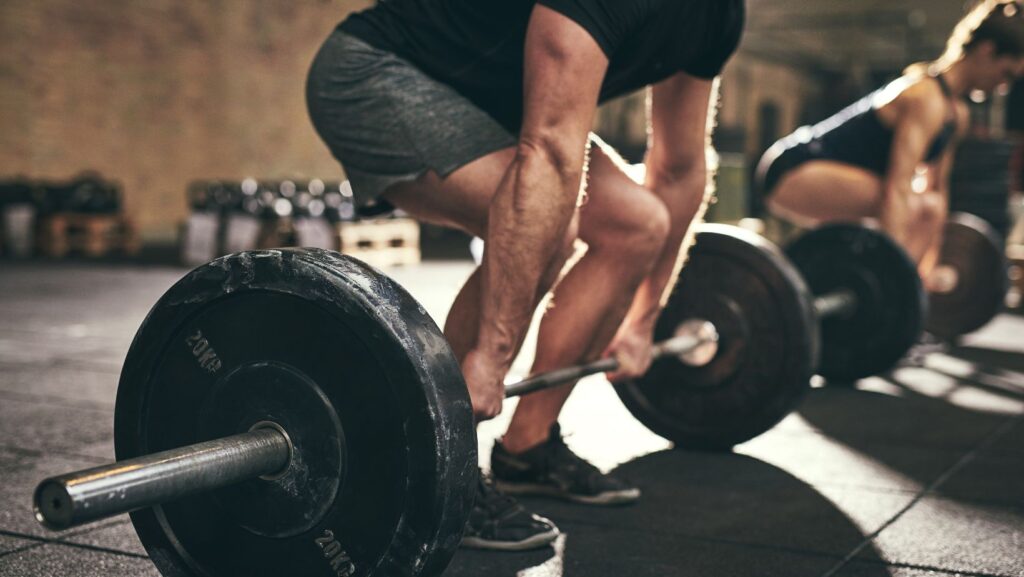
Portraying motion and emotion holds a premier position in fitness photography. Success depends on the capture of dynamic movements, such as an athlete mid-jump, stretched for a yoga pose, lifting a heavy weight, or pushing through a strenuous exercise. These photos involve not just the subject’s physical form, but also their willpower and determination, their strength, and their courage.
For example, a perfectly timed shot of a runner crossing the finish line, fatigue and elation visible on their face, encapsulates the emotion and movement integral to fitness photography. Capturing these elements delivers a telling narrative of the subject’s journey and struggle, creating engaging and inspiring images.
Essential Fitness Photography Tips
 As the previous section elucidated, lighting, motion, and emotion lay the foundation for impactful fitness photography. This section imparts practical tips to enhance your photographic skills in capturing a captivating narrative of grit and resilience.
Photographic equipment forms the backbone of every successful shoot. In fitness photography, a fast lens stands out as an indispensable asset. Opt for a lens with a wide aperture, say f/2.8. Such lenses allow more light in and present greater flexibility in low-light situations.
Similarly, it would be beneficial to invest in a camera capable of high-speed continuous shooting, such as the Canon EOS 1Dx Mark III. This allows you to capture those split-second dynamic movements with a burst of multiple shots.
Tripods also play an integral role by ensuring sharp and stable shots, especially for long shots or when using slower shutter speeds. Brands like Manfrotto and Gitzo are renowned for their robust, durable, and versatile tripods.
Capturing Dynamic and Static Movements
Distinguishing dynamic from static movements can add depth and context to your fitness photography. For static movements, like a Weightlifter in a Hold Position or a Yoga Enthusiast in a Balancing Pose, use a slower shutter speed, about 1/125s to give the perception of calm strength.
Conversely, for capturing dynamic, high-intensity movements such as the explosive action in a Crossfit WOD or the graceful leaps in an Aerobic Routine, a faster shutter speed, such as 1/1000s, freezes the action, creating a sharp, well-defined snapshot in time.
Tips for Post-processing Fitness Photos
 Expounding on in-studio techniques is pivotal for a balanced discourse on fitness photography. Let’s delve deeper into the world of post-processing, spotlighting efficient methods to accentuate muscles and adjust lighting and contrast. Highlighting the fitness model’s muscles stands as a vital part of post-processing in fitness photography. Tools in photo-editing software, such as the Clarity slider in Adobe Lightroom, aid in creating sharp, well-defined images. In practical terms, the photographer adjusts this slider to intensify the contrast between light and dark areas, hence emphasizing the muscles. Further, the photographer utilizes the Dodge and Burn tools in Photoshop, brightening specific areas and darkening others. It’s common practice to brighten muscles and darken the surrounding areas, boosting the perception of depth and creating a three-dimensional effect.